Three.jsでVRなwebページを作ろう【基本実装編】

Three.jsで作ったコンテンツをVRにしてみよう
A-FRAMEでVRなWEBページ制作を目指す、お勉強コンテンツ。
まずはA-FRAMEに行く前に、基本の基本、Three.jsをVRにするにはどうするか、を勉強中です。
前回、Chrome Experimentsから落としてきたGoogleのテンプレをざっと紐解いてみました。
要約すると
・DeviceOrientationControls.jsで3D空間のカメラをスマートフォンの向きに連動させる。
・StereoEffect.jsでHMD用に画面を左右分割する。
でした。
※通常、VRコンテンツを作る際は、VREffect.jsとVRControls.jsを使用しますが、ここでは中身がよりシンプルなStereoEffect.jsを使用しています。
StereoEffect.jsとVREffect.jsの違いは、VREffect.jsはVRデバイスの判別などが入っていたり、左右のカメラのキワを少し歪ませるなど、よりVRに特化したものになります。
ただし、このブログでは、PCでの確認でも2画面にしたい、今のところハコスコで見れればいい、StereoEffect.jsは中身がすごくシンプルなのでカスタムしやすい、等の理由もあり、当分はStereoEffect.jsを使用したいと思います。
ということで、実際にThree.jsで作ったものに、上記2つを組み込んでVRにしてみましょう。
元になるThree.jsコンテンツを用意
まずは元になるコンテンツをThree.jsで作ります。
流れとしては、前回のテンプレにオブジェクトを追加していくのが自然かもしれませんが、今回やりたいのは「作ったものをVR化する」なので、作ってからVR化します。
この流れがわかれば、自分で作ったThree.jsコンテンツはもちろん、誰かが作ったコンテンツや、MMDを組み込んだThree.jsなんかも、ソースさえもってこれれば、VRに出来ちゃうんですよ!!
※自分で作ったコンテンツ以外をVR化した際、それを二次的公開するかどうかは、元コンテンツのライセンス規約に則ってください。くれぐれも勝手に自分の作品として公開しちゃわないように。自分や周りの友達とお楽しみ下さい。
ということで、今回用意したサンプルはこちら。
→サンプルを確認
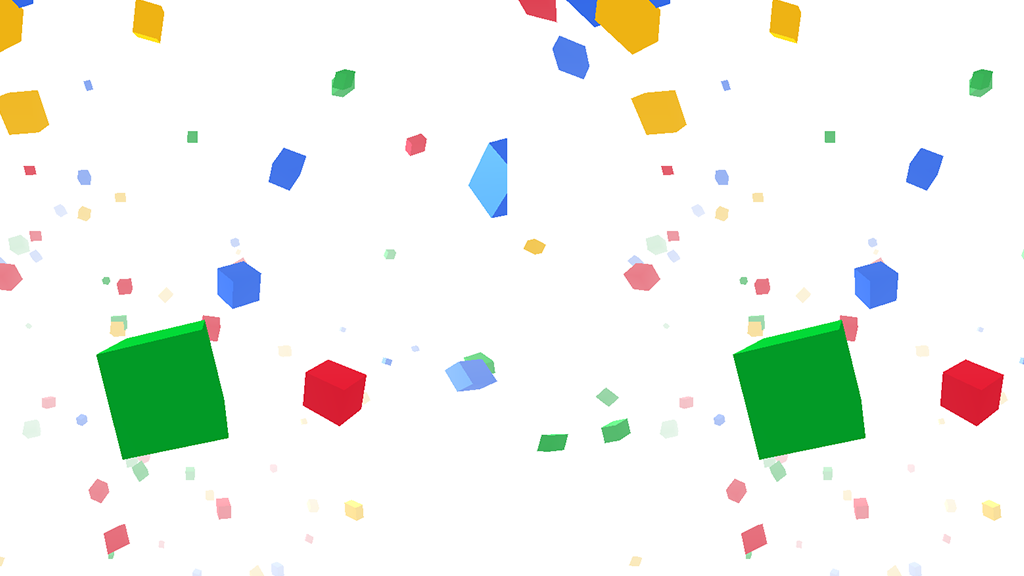
立方体が流れていくだけです。
ソースはこちら。(長いので折りたたんでおきます。)
HTML
<html>
<head>
  <meta charset="UTF-8">
  <meta name="keywords" content="">
  <meta name="description" content="">
  <title>webVRサンプル|CardboardClub</title>
  <meta name="viewport" content="width=device-width, user-scalable=no, minimum-scale=1.0, maximum-scale=1.0">
  <meta http-equiv="X-UA-Compatible" content="IE=edge"/>

  <style>
    *{
      margin: 0;
      padding: 0;
    }
    #base{
      position: absolute;
      left: 0;
      width: 100%;
      height: 9000px;
      z-index: -1;
    }
    #world {
      position: fixed;
      top: 0;
      left: 0;
      right: 0;
      bottom: 0;
    }
  </style>

  <script type="text/javascript" src="./js/lib/jquery-1.11.1.js"></script>
  <script type="text/javascript" src="./js/lib/three.min.js"></script>
  <script type="text/javascript" src="./js/lib/OrbitControls.js"></script>
  <script type="text/javascript" src="./js/lib/Detector.js"></script>
  <script type="text/javascript" src="./js/lib/stats.min.js"></script>
  <script type="text/javascript" src="./js/index.js"></script>

</head>

<body>
  <div id="base"></div>
  <div id="world"></div>
</body>
</html>
index.js
var container;
var camera, scene, renderer, element, controls;
var group;
var baseColor=0xffffff;

$(function() {
  if ( ! Detector.webgl ){
    Detector.addGetWebGLMessage();
  }else{
    init();
    animate();
  }
});

function init(){
  scene = new THREE.Scene();
  container = document.getElementById('world');

  camera = new THREE.PerspectiveCamera( 90, window.innerWidth / window.innerHeight, 1, 10000 );
  camera.position.z = 2000;

  renderer = new THREE.WebGLRenderer({ alpha: true });
  renderer.setPixelRatio( window.devicePixelRatio );
  renderer.setClearColor(baseColor);
  container.appendChild( renderer.domElement );

  //Light
  ambLight = new THREE.AmbientLight( 0xffffff, 0.5 );
  scene.add( ambLight );
  //
  dirLight = new THREE.DirectionalLight( 0xffffff, 1 );
  dirLight.position.set( 1,1,1 );
  scene.add( dirLight );

  //マウス操作
  controls = new THREE.OrbitControls(camera);
  controls.rotateUp(Math.PI / 4);
  controls.target.set(
    camera.position.x + 0.1,
    camera.position.y,
    camera.position.z + 1
  );
  controls.noZoom = true;
  controls.noPan = true;

  stats = new Stats();
  stats.domElement.style.position = 'absolute';
  stats.domElement.style.top = '0px';
  container.appendChild( stats.domElement );

  scene.fog = new THREE.Fog( baseColor, 500,cubeAreaSize );

  window.addEventListener( 'resize', resize, false );
  setTimeout(resize, 1);

  makeCubes();
}

function resize() {
  var width = window.innerWidth;
  var height = window.innerHeight;
  camera.aspect = width / height;
  camera.updateProjectionMatrix();
  renderer.setSize( width, height );
}

function update(){
  cubeUpdate();
}
function render() {
  controls.update();
  renderer.render( scene, camera );
}
function animate() {

  requestAnimationFrame( animate );

  update();
  render();
  stats.update();
}


//CUBE
var cubeColors=[
  0x3369e8,
  0xd50f25,
  0xeeb211,
  0x009925
];
var cubes=[],
cubeCnt=300,
cubeSizeBase=100,
cubeSizeRnd=300,
cubeAreaSize=12000;

function makeCubes(){
  group = new THREE.Group();
  scene.add( group );
  for(var i=0;i<cubeCnt;i++){
    var cube=new Cube();
    group.add(cube.obj);
    cubes.push(cube);
  }
}

function cubeUpdate(){
  for(var i=0; i<cubes.length; i++){
    cubes[i].update();
  }
}

var Cube=function(){
  var size=Math.random()*cubeSizeRnd+cubeSizeBase;
  this.geometry=new THREE.BoxGeometry( size, size, size );
  this.material=new THREE.MeshPhongMaterial({color:cubeColors[Math.floor(Math.random()*cubeColors.length)]});
  this.obj=new THREE.Mesh( this.geometry, this.material );
  this.obj.position.x=Math.random()*cubeAreaSize-cubeAreaSize/2;
  this.obj.position.y=Math.random()*cubeAreaSize-cubeAreaSize/2;
  this.obj.position.z=camera.position.z+(Math.random()*cubeAreaSize*2-cubeAreaSize);
  this.obj.rotation.x=Math.random()*2*Math.PI;
  this.obj.rotation.y=Math.random()*2*Math.PI;
  //this.obj.matrixAutoUpdate = false;
  //this.obj.updateMatrix();
  this.zSpeed=-(Math.random()*100+50);
  this.rSpeedX=Math.random()*0.2-0.1;
  this.rSpeedY=Math.random()*0.2-0.1;
};
Cube.prototype={
  update:function(){
    if(this.obj.position.z<camera.position.z-cubeAreaSize-1000){
      this.obj.position.z=camera.position.z+cubeAreaSize;
      this.obj.position.x=Math.random()*cubeAreaSize-cubeAreaSize/2;
      this.obj.position.y=Math.random()*cubeAreaSize-cubeAreaSize/2;
    }
    this.obj.position.z+=this.zSpeed;
    this.obj.rotation.x+=this.rSpeedX;
    this.obj.rotation.y+=this.rSpeedY;
  }
};
Detector.jsとかstats.jsとか使ってますが、説明は割愛します。
Three.js的に何をやってるかとかも割愛。Three.jsを詳しく説明してくれているサイトはいっぱいあるので、そちらをご参考に。個人的なクセが出ちゃってるかもしれないですが、いや、これはダメだよ!っていう悪癖ソースがあれば、そーっと優しく教えてください。ハート弱いんで。
今回は僕が適当に作ったやつですが、他のコンテンツでも以降の説明はほぼ一緒なので、すでにサンプルの用意がある方は、このサンプルはあんまり気にしないで用意したサンプルでやってみてください。
絢香さんのレインボーロードのスペシャルコンテンツなんか、良さそうですね。
※自分で作ったコンテンツ以外をVR化しても、くれぐれも自分のコンテンツとして公開しないように。自分や周りの友達とお楽しみ下さい。(大事なことなので2回ry)
ちなみに、VRコンテンツに限らず、スマホを横に持って楽しむWEBサイト共通のテックニックですが、Safariなどでスマホを横にしたときにアドレスバーなどが出てこないように、後ろに高さが長いdiv(今回は#base)を置いて、Three.js(今回は#world)はその上にfixedで重ねています。
(上下にスクロールできるページは横にしてもアドレスバーが出てこないです。)
  <style>
    *{
      margin: 0;
      padding: 0;
    }
    #base{
      position: absolute;
      left: 0;
      width: 100%;
      height: 9000px;
      z-index: -1;
    }
    #world {
      position: fixed;
      top: 0;
      left: 0;
      right: 0;
      bottom: 0;
    }
  </style>
さて、これをVR化していきます。
準備としてHTMLにjsを2つ追加しておいてください。
  <script type="text/javascript" src="./js/lib/DeviceOrientationControls.js"></script>
  <script type="text/javascript" src="./js/lib/StereoEffect.js"></script>
DeviceOrientationControls.jsは、three.jsライブラリセットの examples/js/controls/ に、
StereoEffect.jsは同じく examples/js/effect/ に入っています。
DeviceOrientationControlsでジャイロ操作
まずはDeviceOrientationControls.jsを使って、マウス操作のところをジャイロ(スマホの向き)操作にします。
すでにOrbitControlsでマウス操作をしているコンテンツ
controlsの一連の定義の下に下記を追記。
  function setOrientationControls(e) {
    if (!e.alpha) {
      return;
    }
    controls = new THREE.DeviceOrientationControls(camera, true);
    controls.connect();
    controls.update();
    window.removeEventListener('deviceorientation', setOrientationControls, true);
  }
  window.addEventListener('deviceorientation', setOrientationControls, true);
OrbitControlsを使っていないコンテンツ
カメラの定義より下に下記を追記
  controls = new THREE.DeviceOrientationControls(camera, true);
  controls.connect();
render(){}内に下記を追記
function render() {
  controls.update();
  ・・・
}
StereoEffectで2画面分割
次に、StereoEffectを入れて画面を2画面に分けます。
render定義より後ろに下記を追記
  effect = new THREE.StereoEffect( renderer );
  //effect.eyeSeparation = 5;
※コメントアウトしている
effect.eyeSeparation
は、左右の目の距離に合わせ、分割された映像を調整するプロパティです。
基本はいじらなくて大丈夫だと思いますが、ちょっと焦点合わせづらいなどあれば、この値を調整してみてください。
リサイズ処理りているならeffectもリサイズ
function resize() {
  var width = window.innerWidth;
  var height = window.innerHeight;
 ・・・
  //renderer.setSize( width, height );
  effect.setSize( width, height );//これを追記
}
※renderer.setSizeはコメントアウトしなくてもいい(Googleのテンプレはコメントアウトしていない)ですが、コメントアウトしても動作に影響無かったんでしてあります。なにか不具合があればここも疑ってください。そしてここが問題だったら是非おしえてください。
render内を下記に変更
function render() {
  controls.update();
  //renderer.render( scene, camera );//これをやめて
  effect.render( scene, camera );//これを追記
  ・・・
}
以上。
修正したサンプルはこちら。
→サンプルを確認(Cardboardで見て下さい。)
ソースはこちら。(長いので折りたたんでおきます。)
HTML
<html>
<head>
  <meta charset="UTF-8">
  <meta name="keywords" content="">
  <meta name="description" content="">
  <title>webVRサンプル|CardboardClub</title>
  <meta name="viewport" content="width=device-width, user-scalable=no, minimum-scale=1.0, maximum-scale=1.0">
  <meta http-equiv="X-UA-Compatible" content="IE=edge"/>

  <style>
    *{
      margin: 0;
      padding: 0;
    }
    #base{
      position: absolute;
      left: 0;
      width: 100%;
      height: 9000px;
      z-index: -1;
    }
    #world {
      position: fixed;
      top: 0;
      left: 0;
      right: 0;
      bottom: 0;
    }
  </style>

  <script type="text/javascript" src="./js/lib/jquery-1.11.1.js"></script>
  <script type="text/javascript" src="./js/lib/three.min.js"></script>
  <script type="text/javascript" src="./js/lib/OrbitControls.js"></script>
  <script type="text/javascript" src="./js/lib/DeviceOrientationControls.js"></script>
  <script type="text/javascript" src="./js/lib/StereoEffect.js"></script>
  <script type="text/javascript" src="./js/lib/Detector.js"></script>
  <script type="text/javascript" src="./js/lib/stats.min.js"></script>
  <script type="text/javascript" src="./js/index.js"></script>

</head>

<body>
  <div id="base"></div>
  <div id="world"></div>
</body>
</html>
index.js
var container;
var camera, scene, renderer, element, controls;
var group;
var baseColor=0xffffff;

$(function() {
  if ( ! Detector.webgl ){
    Detector.addGetWebGLMessage();
  }else{
    init();
    animate();
  }
});

function init(){
  scene = new THREE.Scene();
  container = document.getElementById('world');

  camera = new THREE.PerspectiveCamera( 90, window.innerWidth / window.innerHeight, 1, 10000 );
  camera.position.z = 2000;

  renderer = new THREE.WebGLRenderer({ alpha: true });
  renderer.setPixelRatio( window.devicePixelRatio );
  renderer.setClearColor(baseColor);
  container.appendChild( renderer.domElement );

  //Light
  ambLight = new THREE.AmbientLight( 0xffffff, 0.5 );
  scene.add( ambLight );
  //
  dirLight = new THREE.DirectionalLight( 0xffffff, 1 );
  dirLight.position.set( 1,1,1 );
  scene.add( dirLight );

  //マウス操作
  controls = new THREE.OrbitControls(camera);
  controls.rotateUp(Math.PI / 4);
  controls.target.set(
    camera.position.x + 0.1,
    camera.position.y,
    camera.position.z + 1
  );
  controls.noZoom = true;
  controls.noPan = true;

  //ジャイロに切り替え
  function setOrientationControls(e) {
    if (!e.alpha) {
      return;
    }
    controls = new THREE.DeviceOrientationControls(camera, true);
    controls.connect();
    controls.update();
    window.removeEventListener('deviceorientation', setOrientationControls, true);
  }
  window.addEventListener('deviceorientation', setOrientationControls, true);

  //両眼カメラレンダリング
  effect = new THREE.StereoEffect( renderer );
  //effect.eyeSeparation = 5;

  stats = new Stats();
  stats.domElement.style.position = 'absolute';
  stats.domElement.style.top = '0px';
  container.appendChild( stats.domElement );

  scene.fog = new THREE.Fog( baseColor, 500,cubeAreaSize );

  window.addEventListener( 'resize', resize, false );
  setTimeout(resize, 1);

  makeCubes();
}

function resize() {
  var width = window.innerWidth;
  var height = window.innerHeight;
  camera.aspect = width / height;
  camera.updateProjectionMatrix();
  //renderer.setSize( width, height );
  effect.setSize( width, height );
}

function update(){
  cubeUpdate();
}
function render() {
  controls.update();
  //renderer.render( scene, camera );
  effect.render( scene, camera );
}
function animate() {

  requestAnimationFrame( animate );

  update();
  render();
  stats.update();
}


//CUBE
var cubeColors=[
  0x3369e8,
  0xd50f25,
  0xeeb211,
  0x009925
];
var cubes=[],
cubeCnt=300,
cubeSizeBase=100,
cubeSizeRnd=300,
cubeAreaSize=12000;

function makeCubes(){
  group = new THREE.Group();
  scene.add( group );
  for(var i=0;i<cubeCnt;i++){
    var cube=new Cube();
    group.add(cube.obj);
    cubes.push(cube);
  }
}

function cubeUpdate(){
  for(var i=0; i<cubes.length; i++){
    cubes[i].update();
  }
}

var Cube=function(){
  var size=Math.random()*cubeSizeRnd+cubeSizeBase;
  this.geometry=new THREE.BoxGeometry( size, size, size );
  this.material=new THREE.MeshPhongMaterial({color:cubeColors[Math.floor(Math.random()*cubeColors.length)]});
  this.obj=new THREE.Mesh( this.geometry, this.material );
  this.obj.position.x=Math.random()*cubeAreaSize-cubeAreaSize/2;
  this.obj.position.y=Math.random()*cubeAreaSize-cubeAreaSize/2;
  this.obj.position.z=camera.position.z+(Math.random()*cubeAreaSize*2-cubeAreaSize);
  this.obj.rotation.x=Math.random()*2*Math.PI;
  this.obj.rotation.y=Math.random()*2*Math.PI;
  //this.obj.matrixAutoUpdate = false;
  //this.obj.updateMatrix();
  this.zSpeed=-(Math.random()*100+50);
  this.rSpeedX=Math.random()*0.2-0.1;
  this.rSpeedY=Math.random()*0.2-0.1;
};
Cube.prototype={
  update:function(){
    if(this.obj.position.z<camera.position.z-cubeAreaSize-1000){
      this.obj.position.z=camera.position.z+cubeAreaSize;
      this.obj.position.x=Math.random()*cubeAreaSize-cubeAreaSize/2;
      this.obj.position.y=Math.random()*cubeAreaSize-cubeAreaSize/2;
    }
    this.obj.position.z+=this.zSpeed;
    this.obj.rotation.x+=this.rSpeedX;
    this.obj.rotation.y+=this.rSpeedY;
  }
};
こんなシンプルなコンテンツでも、2眼でみると奥行きがでて結構楽しい!!
次回、もう少しだけこれをいじってみたら、別なライブラリもやってみます。
(これからGWに入って田舎に帰省しちゃうので、次回更新いつになるやら。)
首を長くしないでのんびり待っててください。
